
Introduction
Internet frameworks/libraries in Python present an excellent basis for builders who need to develop web site purposes by combining totally different options offered by these libraries in Python. Because of its simplicity, many builders have used Python, even for web site utility improvement for the backend. Knowledge Science and Machine Studying have just lately turn into a key a part of these web site apps. So builders consistently search for libraries that permit them to combine these into their purposes.
Standard libraries in Python embody Flask and Django. Django is used for constructing large-scale apps. On the opposite aspect, Flask is for lighter apps. However these normally perform just like the backend, the place the developer has to write down the web site’s HTML, CSS, and Javascript individually. That is the place new libraries like Streamlit and Pynecone are available in, permitting the developer to create a full-fledged full-stack utility immediately by way of Python without having HTML, CSS, or Javascript information. On this article, we’ll discuss one such library known as Pynecone, which is comparatively new and gaining reputation every day.
Studying Goals
- Be taught concerning the Pynecone library
- Understanding easy methods to set up the Pynecone package deal
- To discover ways to get began with Pynecone to develop full-stack purposes
- Perceive the challenge format of a Pynecone challenge and easy methods to run them
This text was printed as part of the Data Science Blogathon.
Desk of Contents
What’s Pynecone? Why a brand new Internet Framework?
Pinecone is a full-stack versatile library for constructing and deploying extremely scalable web site purposes. So why Pynecone? What makes it totally different from different Frameworks? Pinecone is created with the intent of utilizing Python for all the pieces. One doesn’t must study a brand new language aside from Python to develop a full-stack web site. Pynecone, new to the Internet Framework, is filled with helpful options to simply get began with constructing from small information science purposes to giant, extremely scalable multi-page web sites.
Additionally, Pynecone is sort of versatile just like older libraries. Pynecone is a beginner-friendly framework however can show highly effective sufficient for creating and deploying complicated use instances. Pynecone takes care of all the pieces from the entrance finish to the again finish to the deployment of the appliance. Pynecone is designed to simplify the method of constructing a whole web site from scratch to deployment of that app utterly by way of python without having to study and write frontend language.
Use Circumstances and Functions of Pynecone
1. To deploy web-based machine studying purposes
Pynecone works for each entrance and backend in web-based machine studying purposes. It integrates with a database which will be useful in storing prediction labels and different related information. This database may even be used to retailer the mannequin parameters in order that the mannequin can load its parameters and make predictions.
2. Within the information science subject, constructing visible dashboards
Visualizations are essential when coping with Knowledge Science. They inform how properly a enterprise is working, how properly a provide chain is being maintained, and the way properly the purposes carry out. With Pynecone, these visualization dashboards will be made easy utilizing the chart parts accessible in them.
3. Constructing web site prototypes in a brief interval of time
Time is crucial when constructing prototypes and presenting them to the shopper. The quicker one builds, the quicker one will get suggestions, and the faster one could make the suitable adjustments. Pynecone is finest for constructing light-weight apps like enterprise prototypes very quickly.
4. In creating and deploying large-scale purposes
As mentioned, Pynecone is de facto useful in constructing light-weight information science purposes. Nevertheless it doesn’t shrink back from constructing greater ones. Pynecone could be very a lot able to constructing giant multi-page web sites, due to its simple integration of React parts with Python.
Getting Began – Putting in Pynecone
To put in Pynecone, the Python model have to be 3.7 and above, and the NodeJS model have to be 12.22.0 and above. You may obtain the newest NodeJS from their official website. Simply because we’re downloading NodeJS doesn’t imply we might be writing Javascript code; it’s only a prerequisite to putting in Pynecone. After guaranteeing we have now the precise setting, we will go forward and set up Pynecone utilizing the pip command.
$ pip set up pyneconeThis can then set up the Pynecone library and a few dependencies it’ll rely on.
Creating Our First Pynecone Venture
On this part, we’ll discover ways to create a brand new Pynecone Venture. Now open the CMD to create a brand new listing; let’s identify it pyne_project. Now let’s transfer into the pyne_project listing and name the command laptop init.
$ mkdir pyne_project

$ cd pyne_project

$ laptop init
When putting in Pynecone, with it the laptop command line software might be put in; this software is used to create and run new tasks. The laptop init command will create a brand new Pynecone challenge by creating some information and directories, which will be seen beneath (I’ve opened pyne_project in VS Code)
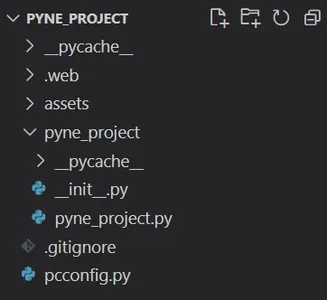
We see that laptop init has created folders like pyne_project (just like the identify of the folder we created), and information like pcconfig.py, pyne_project.py (right here once more, the .py file identify is just like the identify of the folder we have now created), and many others. The Property folder shops all our web sites’ static information, like pictures we need to show on the web site are saved right here. The .net is the place the Pynecone entrance finish compiles to a NextJS app. The pcconfig.py incorporates the configurations for our utility.
We don’t have to fret about these information; the one file we might be modifying is the pyne_project.py which is within the pyne_project folder. So principally, we have now created a folder pyne_project and known as laptop init, which in flip created one other folder pyne_project and a file known as pyne_project.py which we might be working upon. The pyne_project.py already has some demo code in it, so now, sort the beneath command within the CMD to run our demo web site.
$ laptop runThis can run the code and can take some time if you first use this command laptop run for a brand new challenge. Now we will entry the web site from the localhost:3000
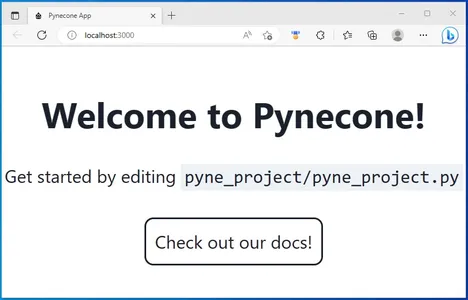
We will see that the webpage tells us to edit pyne_project.py positioned within the pyne_project folder, which was created utilizing laptop init. Press ctrl + c to cease the server.
Constructing a Easy Internet App – Multiply and Divide
On this part, we’ll create our new web site from scratch and perceive all the pieces that goes into constructing the appliance. The web site we’ll create is a straightforward utility that incorporates 2 buttons known as Multiply, which multiplies a quantity by 2 once we click on on it, and Divide, which divides a quantity by 2 once we press the button.
The very first thing we might be creating is a category known as State. This class compromises all of the variables that may change in our utility, and we even outline the features that change these variables within the class itself. Let’s check out an instance code beneath:
import pynecone as laptop


class State(laptop.State):
    starting_value = 1


    def multiply(self):
        self.starting_value *= 2


    def divide(self):
        self.starting_value /= 2
Right here we’re defining this class that inherits from the laptop.State. As we create an utility that may divide and multiply a quantity by 2, we have to set a beginning worth for this quantity. So within the above code, we outlined a variable starting_value after which handed a price of 1. We even outlined the features multiply and divide, which change the worth of this variable known as starting_value, i.e., both multiply it by 2 or divide it by 2.
These features, multiply and divide, are identified by Occasion Handlers. Occasion handlers are the one attainable solution to edit the state (and its variables) in a Pynecone utility. These are known as in response to consumer actions; when a consumer clicks a Multiply button, this multiply perform is activated. These actions are known as occasions. So that is how we create this class, the place we outline all of the variables that might be used within the utility and the features that may change these variables.
Now we’ll write the frontend half for our utility, creating buttons for multiplying and dividing and even displaying this starting_value within the browser. All of this might be executed in Python utilizing the Pynecone library itself. For writing the frontend a part of the appliance, we’ll create a perform known as index and write the frontend half in it. The next is the code for the entrance of our utility:
def index():
    return laptop.hstack(
        laptop.button(
            "Multiply",
            color_scheme="blue",
            border_radius="1em",
            on_click=State.multiply,
        ),
        laptop.textual content(State.starting_value , font_size="2em"),
        laptop.button(
            "Divide",
            color_scheme="crimson",
            border_radius="1em",
            on_click=State.divide,
        ),
    )
The primary perform we have now used is the hstack() perform from Pynecone. hstack() lets us create buttons and place them in a horizontal trend. For vertical we’ll use one thing known as vstack().
To create the button, we used the button() from Pynecone. And the parameters used on this perform are self-explanatory, i.e., the primary parameter is the button identify (“Multiply” and “Divide”, in our case), subsequent is the color_scheme, which defines the colour of the button, adopted by that’s the border_radius, which complies how curved the borders have to be. The final parameter is the on_click, which decides which perform to name/ what motion to take when the respective button is clicked. For the Multiply button, the on_click is ready to multiply perform (multiply perform outlined within the class we created) and for the Divide button, it’s set to divide perform.
The textual content() from Pynecone is used to show the worth of the starting_value. All these features hstack(), button(), and textual content() are known as Parts that construct the frontend. Our Multiply and Divide web site is sort of full. For the web site to run, we have to outline the routing and compiling which is finished as follows:
app = laptop.App(state=State)
app.add_page(index)
app.compile()
Firstly, we outline which state to make use of within the laptop.App() perform. As we have now just one, we cross this to the variable within the laptop.App(). Subsequent might be our root URL, which is our dwelling web page, and this would be the index as a result of, within the index() perform, we have now outlined the frontend for our utility, thus we cross the perform identify i.e., index to the app.add_page(). Lastly, we compile our app utilizing the app.compile()
Testing – Mutiply and Divide App
On this part, we’ll run our utility and guarantee it really works correctly. Lastly, we have now written all of the code and created a frontend for our utility. Now to run the web site, use the command laptop run.
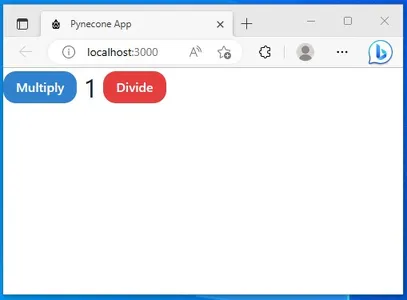
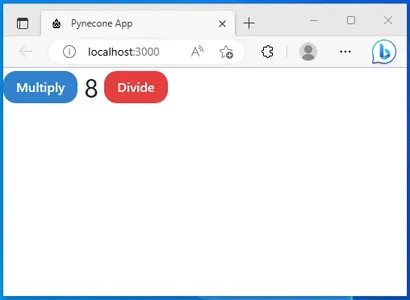
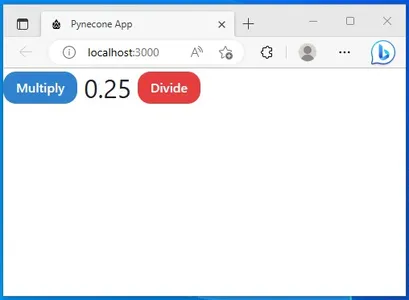
We will see that the web site is being run efficiently. There are two buttons known as Multiply and Divide, and between these two buttons, we see the worth of the variable starting_value, which was outlined within the class we have now created. After clicking multiply 3 instances, we get the next output.
After clicking on divide 5 instances, we get the next output
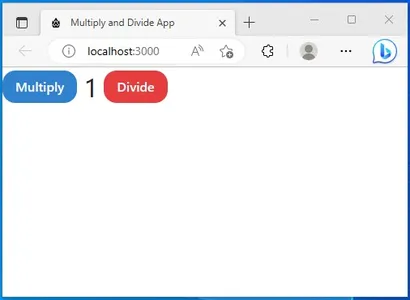
Thus our easy Multiply and Divide App is working completely wonderful. To vary the identify of the appliance, we will add a parameter known as title within the app.add_page() and provides it the identify of the web site
app.add_page(index, title="Multiply and Divide App")By altering the title, we will change the app identify of our web site, now once we re-load the web page, the identify will get modified
What Makes Pynecone Completely different from Others like Flask?
Pynecone is a comparatively new Internet Framework designed to construct purposes utterly in Python. Flask is likely one of the in style libraries used to construct web sites in Python. Python with Flask is especially for the backend of an utility, the place the developer has to write down the frontend code. What makes Pynecone totally different is its capacity to even write the frontend a part of the web site in Python itself, thus lowering the overhead of studying HTML, CSS, and Javascript.
One other factor that differentiates Pynecone from different libraries like Flask and Django is that Pynecone compiles your complete code right into a NextJS/ReactJS app, which might be actually useful as a result of, with that, the react libraries will be mixed in Python in hours in comparison with different libraries which take for much longer time. The Pynecone comes with greater than 50+ Parts, thus offering sufficient of them to begin constructing information science purposes simply.
Conclusion
On this article, we have now gone by way of a brand new Internet Framework known as Pynecone, which may utterly construct web sites from the entrance finish to the again finish by way of Python. Sooner or later, Pynecone will even deploy these website-based purposes. We’ve got seen a walkthrough of easy methods to set up Pynecone and get began with it. Additionally, we regarded into the challenge format and totally different Parts that go into the Pynecone utility.
A few of the key takeaways from this embody:
- Pynecone is a Full-Stack Internet Framework for Python.
- It supplies a simple-to-use API, making constructing the frontend a part of the purposes simple.
- With Pynecone, it’s simple so as to add totally different ReactJS libraries in Python.
- Pynecone will even characteristic the deployment of purposes within the close to future with a greater net framework.
The media proven on this article just isn’t owned by Analytics Vidhya and is used on the Creator’s discretion.


